
How to Check SSD Health? – Step Guide

Behind every fast and responsive computer is a combination of hardware components working together. Among them, the storage drive plays an important role, with HDDs and SSDs being the two most common options. As the need for faster performance continues to grow, SSDs have become the preferred choice for many users.
Similar to a battery, the performance of an SSD degrades over time. In case of damage to the drive, you will end up losing all your important data. Such problems are experienced by many users in Bangladesh since they do not frequently monitor the health of their drives.
Checking your SSD health regularly can help you identify potential issues before they affect your data or system performance. Here’s how you can do it step by step.
Signs That Something Might Be Wrong
Most people don’t check their SSD health unless they start facing problems. However, checking it regularly can help you detect issues early. If something is wrong with your SSD, you may notice the following signs.
- The speed of the computer seems slow compared to its usual performance
- Apps take forever to open or crash randomly
- Files become corrupted or go missing for no reason
- You’re seeing the Blue Screen of Death more often
- Your drive occasionally disappears from File Explorer
If one or more of these symptoms apply to you, you should consider looking after your drive’s health.
How to Check SSD Health on Windows
Checking your SSD health on Windows helps you catch drive problems early and protects your data. You can easily use built-in Windows tools to make sure your drive is running healthy and fast.
Method 1: Windows Settings (Quickest Way)
No downloads, no commands. Just your built-in Windows settings.
- Open Settings from the Start Menu
- Go to System > Storage
- Click Advanced storage settings > Disks & Volumes
- Select your SSD and look for Drive Health
You’ll see info like estimated remaining life, available spare, and temperature. If this section doesn’t appear on your Personal Computer, your drive or controller may not support it. Move to Method 2 instead.
Method 2: Command Prompt (Quick Health Check)
This is the fastest way to get a basic yes or no answer about your drive’s condition.
- Press the Windows key, type CMD, and open it as Administrator
- Type “wmic” and press Enter
- Type “diskdrive get status” and press Enter
If you see “OK,” your drive is fine. If you see “Pred Fail,” back up your data immediately and start planning a replacement. This one result alone can save you from a major data loss.
Keep in mind: This method only gives you a surface-level result. For a deeper look, use PowerShell.
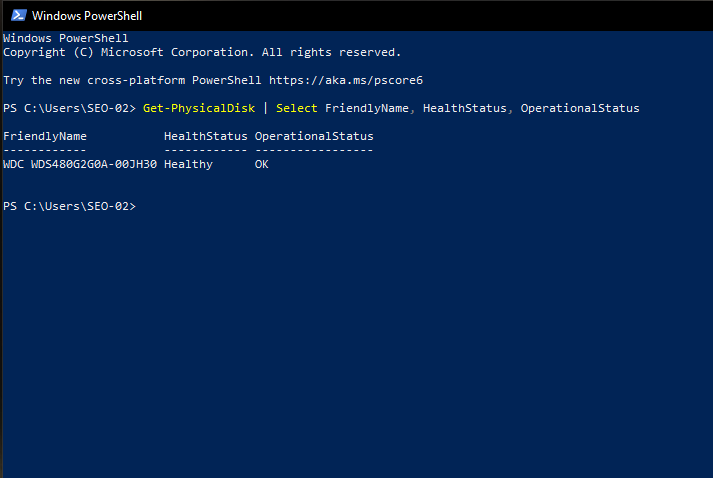
Method 3: PowerShell (Deeper Diagnosis)
For a more detailed picture, PowerShell gives you real health data directly from the drive.
- Search PowerShell, right-click, and run as Administrator
- Paste this command and press Enter:
“Get-PhysicalDisk | Select FriendlyName, HealthStatus, OperationalStatus”
This shows you each drive’s name, its health status (Healthy / Warning / Unhealthy), and its operational state. If you want to check for predicted failure specifically, run this:
“Get-WmiObject -Namespace root\wmi -Class MSStorageDriver_FailurePredictStatus | Select InstanceName, PredictFailure, Reason”
A PredictFailure: “False” result means you’re in the clear. “True” means act fast.
Method 4: Task Manager (For Real-Time Performance Issues)
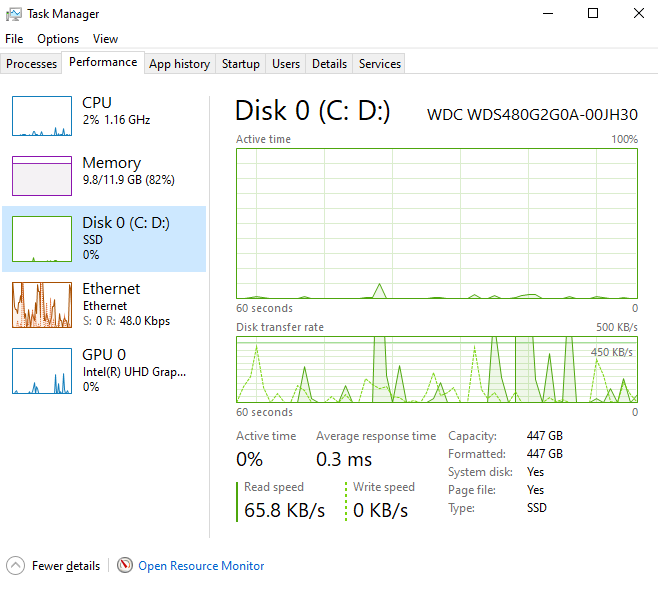
If your PC feels slow but you’re not sure why, Task Manager can show you if the SSD is the bottleneck.
- Press Ctrl + Shift + Esc to open Task Manager
- Click the Performance tab
- Select your disk
Watch the Active Time, Read/Write Speed, and Response Time. A healthy SSD should have an active time mostly below 50%, and response time should stay around 1 to 5 ms. If the active time is constantly at 100% but the speed is low, your drive may be struggling.
Method 5: Use CrystalDiskInfo (Best Free Tool)
If you want the full picture, CrystalDiskInfo is the go-to free tool trusted by millions of users worldwide. It reads your SSD’s SMART data and translates it into plain, easy-to-read information.
After installing and opening it, you’ll see:
- Overall health status (Good / Caution / Bad)
- Drive temperature
- Power-on hours
- Total data written (lifetime)
- Wear level percentage remaining
A “Good” status with a high remaining life percentage means your drive is in great shape. A “Caution” or “Bad” rating means it’s time to take action.
Method 6: Manufacturer Tools
If you know your SSD brand, the manufacturer’s own software usually gives the most accurate and detailed report:
- Samsung SSD → Samsung Magician
- Seagate → SeaTools
- Western Digital / WD → WD Dashboard
- Kingston SSD → Kingston SSD Manager
These tools not only show your drive’s health but also let you run diagnostic tests, update firmware, and in some cases, even attempt to fix errors.
For Mac Users
Checking SSD health on a Mac is just as simple.
- Press Command + Space and search for Disk Utility
- Select your SSD from the left panel
- Look for the S.M.A.R.T. Status field at the bottom
“Verified” means your SSD has no critical issues detected. If it says “Failing,” back up your data right away.
For a bit more detail, open Terminal and run:
“diskutil info disk0”
This shows drive type, connection info, and basic SMART status. For more in-depth SMART data, consider a free third-party tool like DriveDx (Mac-specific).
What Should You Do in Case of SSD Failure?
If you receive an error or warning, do the following immediately:
- Make sure that your data is saved immediately by transferring them to other media or to the cloud while your SSD doesn’t worsen.
- Avoid saving large files or installing new programs before backing up your data.
- Find the latest update available from your SSD manufacturer to resolve bugs or false alerts
- In case the health condition of your SSD is extremely bad, replacement is the only solution.
Tips for Extending SSD Lifespan
Keeping the SSD in good condition needs just some minor actions that pay off quite a lot:
- Leave about 20% free space: Keep enough space free to improve efficiency and lifespan.
- Never defragment SSDs: Defragmentation is unnecessary for SSDs and may shorten their lifespan, whereas it is needed for HDDs.
- Enable TRIM: By default, TRIM is enabled on Windows 10 and 11 operating systems, but it is better to check it.
- Keep it cool: Work your PC or laptop under good ventilation conditions.
- Turn it off regularly: Prevent sudden power loss because it may be harmful for the SSD.
Before You Go
It is a very easy process that will take only a couple of minutes, but which can protect you from serious loss and future troubles. Do not wait until your SSD fails; check it from time to time and make sure that your data is saved. The good condition of your SSD will make your work with a computer much more pleasant.
In case you want to update your SSD, we at Apple Gadgets have a lot of authentic SSDs and computer accessories to offer you at reasonable prices. Just have a look at our selection.
Mohammad Shariful Islam is the CEO and MD of Apple Gadgets, a leading e-commerce and retail chain for gadgets in Bangladesh. He has a passion for technology, entrepreneurship, and holds a decade of experience in gadget E-Commerce. He’s committed to providing the best possible shopping experience for customers by delivering the latest and trendy gadgets.